The Perfect Pair
Listen, I’ve been at this for over a decade, and if there’s one thing that still makes my brain itch, it’s seeing a gorgeous yarn ruined by the wrong hook. We’ve all been there—you’re excited, you grab a random hook from the junk drawer, and three hours later your “scarf” is stiff enough to be a weapon or so gappy it wouldn’t warm a hamster.
It’s all about the chemistry between your fiber and that little stick. Honestly, think of them like a blind date; if they don’t vibe, the whole night is a disaster. Let’s break down the “why” and “how” so you can stop guessing and start actually enjoying the process. In this guide, we’re going to decode the sizing systems for both, so you can walk into any yarn shop with confidence and know exactly what tools you need to bring your vision to life.
The “Thickness” Spectrum (Or: Why “Weight” Isn’t About the Scale)
Honestly, when I first started, I thought “yarn weight” meant I needed to bring a kitchen scale to the craft store. I was so wrong. In our world, “weight” is just a fancy industry term for the thickness of the individual strand. It’s basically a way to categorize how “chunky” or “skinny” the fiber is so you don’t end up trying to crochet a winter coat with thread.
The Craft Yarn Council—bless them for trying to bring order to the chaos—created a standard numbering system from 0 to 7. It sounds a bit clinical, but once you get the hang of it, it’s like a secret code that tells you exactly what a yarn is capable of. Let’s peel back the layers on these categories:
- Category 0 (Lace): We’re talking absolute gossamer vibes here. This is the stuff of vintage doilies, heirloom tablecloths, and those ethereal, airy shawls that look like they’d melt if you breathed on them too hard. It’s basically thread, so if you have a short temper, maybe save this for when you’re feeling particularly Zen.
- Category 1 (Super Fine): Most people call this “Fingering” or “Sock” yarn. It’s the darling of the knitting world, but for us crocheters, it makes for incredibly detailed baby clothes and, obviously, socks. It takes forever to see progress because the stitches are so tiny, but the finished texture? Total chef’s kiss.
- Category 2 (Fine): Commonly known as “Sport” weight. It’s the perfect “middle child”—a bit beefier and faster to work with than fingering weight, but it still maintains a light, delicate feel that won’t weigh you down.
- Category 3 (Light): You’ll usually see this labeled as “DK” (which stands for Double Knit). This is the absolute sweet spot for garments. It’s light enough to have a beautiful drape but thick enough that you won’t be working on a single sweater for three years. It’s perfect for those transitional pieces you wear when the AC is just a bit too high.
- Category 4 (Medium): The “Workhorse.” If you walk into a big-box craft store, about 70% of what you see is this stuff. It’s widely known as “Worsted” or “Aran” weight. It’s incredibly versatile and beginner-friendly because you can actually see what you’re doing. It’s exactly what I reached for when I whipped up that [Zero-Sew Mushroom] pattern I posted recently!
- Category 5 (Bulky): Often called “Chunky” yarn. This is your best friend when you’ve realized your bestie’s birthday is tomorrow and you haven’t made a gift yet. It works up fast, feels incredibly squishy, and is perfect for those oversized, cozy scarves and hats that make you look like you’ve stepped out of a Pinterest board.
- Category 6 (Super Bulky): This is the “instant gratification” tier. It’s very thick, very plush, and usually results in those giant, cozy blankets that people love to snuggle under during a movie marathon.
- Category 7 (Jumbo): The thickest of the thick. We’re talking yarn the size of a rope. This is the stuff people use for arm-knitting or with hooks that look more like rolling pins. It’s great for high-impact home decor, like those massive floor poufs or wall hangings.
My little piece of advice? Don’t just look at the number. Give the yarn a squish! Sometimes a “4” from one brand feels suspiciously like a “3” from another. It’s all part of the “character” of the hobby, I suppose.
The Great Hook Size Headache (And How to Cure It)
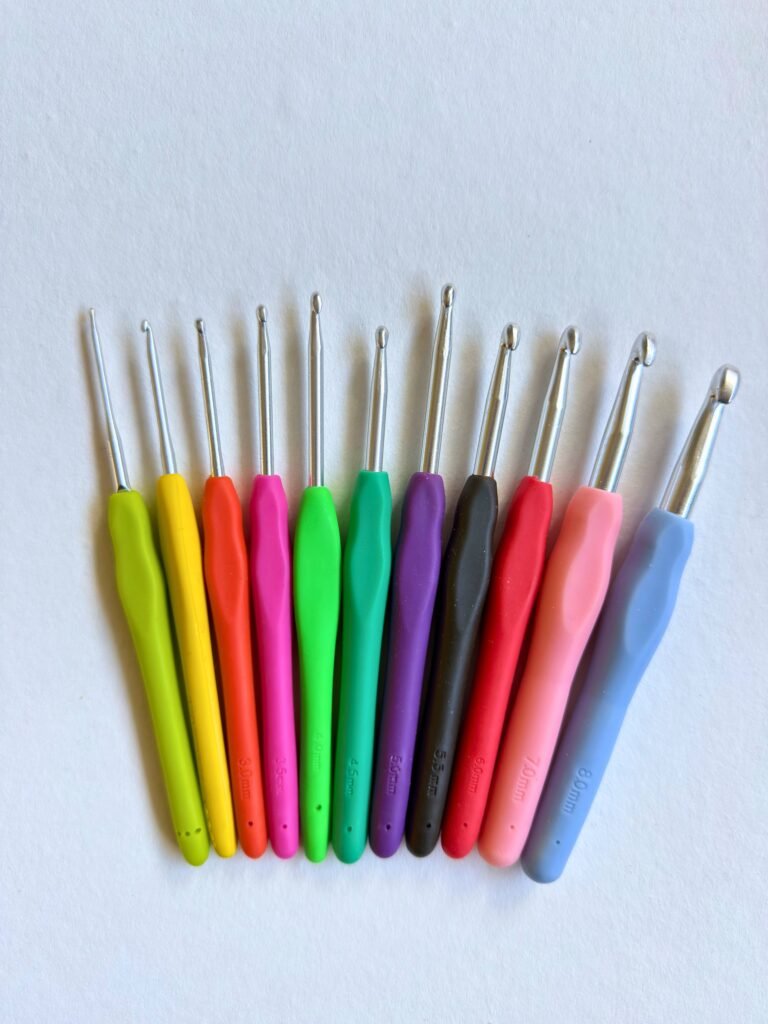
Honestly, if I could sit every hook manufacturer down in a room and make them agree on one single naming convention, I’d do it in a heartbeat. But until that miracle happens, we’re stuck with a system that feels like it was designed by three different people who weren’t allowed to talk to each other.
When you’re standing in the craft aisle staring at a wall of aluminum and bamboo, it’s easy to feel a bit cross-eyed. Here’s the “insider” breakdown of the three systems you’ll run into:
1. Metric (The No-Nonsense Way)
In my ten years of doing this, I’ve learned that the Metric (mm) measurement is your only true friend. It’s the “universal language” of fiber arts because it measures the actual diameter of the hook’s shaft in millimeters.
If a pattern calls for a 5.0mm hook, it doesn’t matter if you’re in London, Tokyo, or a tiny village in the Alps—a 5.0mm shaft is a 5.0mm shaft. Most modern hooks have this tiny number etched right into the grip, and I highly recommend making this your primary reference point to avoid those “wait, why is my blanket the size of a postage stamp?” moments.
2. US Sizes (The Alphabet Soup)
Our friends in the States decided to use a combination of letters and numbers, like G/6 or H/8. On paper, it sounds simple: as the letter moves down the alphabet, the hook gets bigger.
However, there’s a sneaky catch. One brand’s “H” might be 5.0mm, while another brand’s “H” might be 5.25mm. It sounds like a tiny difference, but over thousands of stitches, that extra quarter-millimeter will absolutely change the size of your finished project. If you’re following a US pattern, always double-check the millimeter equivalent listed in the pattern notes.
3. UK & Canadian Sizes (The Upside-Down World)
This is where things get truly chaotic. Historically, the UK and Canada used a numerical system where the higher the number, the smaller the hook.
It’s completely counter-intuitive. A Size 14 is a tiny little needle-like hook used for gossamer lace, while a Size 0 is a chunky beast for heavy yarn. It’s the “golf score” of crochet—you want a low number for a big hook. Thankfully, this system is becoming less common in modern patterns, but if you’re diving into your grandmother’s vintage pattern stash, keep this “reverse logic” in mind so you don’t accidentally try to crochet a bulky scarf with a lace hook!
My “Pro-Tip” for Your Sanity
If you’re ever in doubt—or if the size has rubbed off your favorite hook (it happens to the best of us!)—buy a cheap hook gauge tool. It’s a little plastic or metal card with holes in it. If the hook fits snugly into the 4mm hole, it’s a 4mm hook. No guessing, no math, no tears.
Seriously, just stick to the millimeters. It’s the only way to ensure your “Perfect Pair” doesn’t turn into a total “Project Fail.”
The Master Conversion Chart
To make your life easier, here is a quick-reference chart to help you match your yarn weight with the recommended hook size.
| Yarn Category | Name | Recommended Hook Size (Metric) | Recommended Hook Size (US) |
| 0 | Lace | 1.6mm – 2.25mm | Steel Hook 6, 7, 8 or B-1 |
| 1 | Super Fine | 2.25mm – 3.5mm | B-1 to E-4 |
| 2 | Fine | 3.5mm – 4.5mm | E-4 to 7 |
| 3 | Light (DK) | 4.5mm – 5.5mm | 7 to I-9 |
| 4 | Medium (Worsted) | 5.5mm – 6.5mm | I-9 to K-10.5 |
| 5 | Bulky | 6.5mm – 9.0mm | K-10.5 to M/N-13 |
| 6 | Super Bulky | 9.0mm – 15mm | M/N-13 to Q |
| 7 | Jumbo | 15mm + | Q and large |
When to Toss the Rulebook
The chart above is a starting point, but in crochet, rules are sometimes meant to be broken! The label on your yarn is a suggestion, not a law. I “break” these rules constantly, and honestly, you should too once you feel comfortable
- The Amigurumi Exception: When I’m making plushies, I want those stitches tight. Nobody wants to see polyester stuffing leaking out of a teddy bear’s neck. I usually drop down a full millimeter or two from what the label says.
- The “Floof” Factor: If you want a shawl to drape beautifully like a high-end boutique piece, grab a hook that’s way too big for the yarn. It creates these lovely, loopy stitches that move with you.
- You (Yes, You): Some people crochet like they’re trying to strangle the yarn (tight tension), and others are super loosey-goosey. You’ll eventually learn if you need to size up or down to compensate for your own hands.
How to Check the Yarn Label
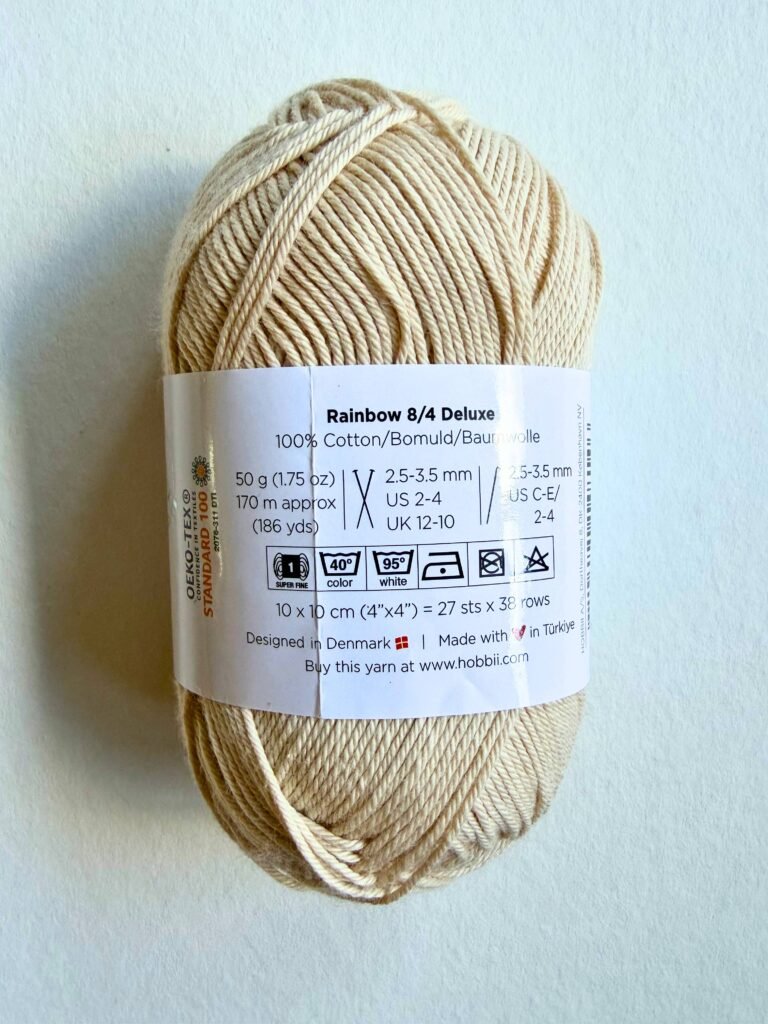
Almost every skein of yarn has a tiny “cheat sheet” on the back. It usually features a small icon of a crochet hook with a number inside or next to it. This is the manufacturer’s suggestion for that specific yarn.
Yda’s Pro Tip: If you lose the label, you can use the “Wraps Per Inch” (WPI) method. Wrap your yarn around a pencil for one inch. Count the number of wraps—the more wraps, the thinner the yarn!
Reading the “Cheat Sheet”
Most yarn labels have a little square icon with a hook in it. That’s your starting line. If you’ve lost the label (I have a drawer full of “mystery yarn,” no judgment here), try the Wraps Per Inch (WPI) trick. Just wrap the yarn around a pencil for an inch and count the loops. More loops = thinner yarn. Simple, right?
I always tell others: just make a swatch. I know, I know, swatching feels like doing homework before the party, but a 4-inch square tells you everything you need to know about how that yarn and hook are going to behave together.
Still feeling a bit wobbly? Scour my [Top 10 Tips for Beginners] or just dive in with my [Simple Cotton Market Bag]. Nothing teaches you faster than actually having a hook in your hand and some yarn over your finger!