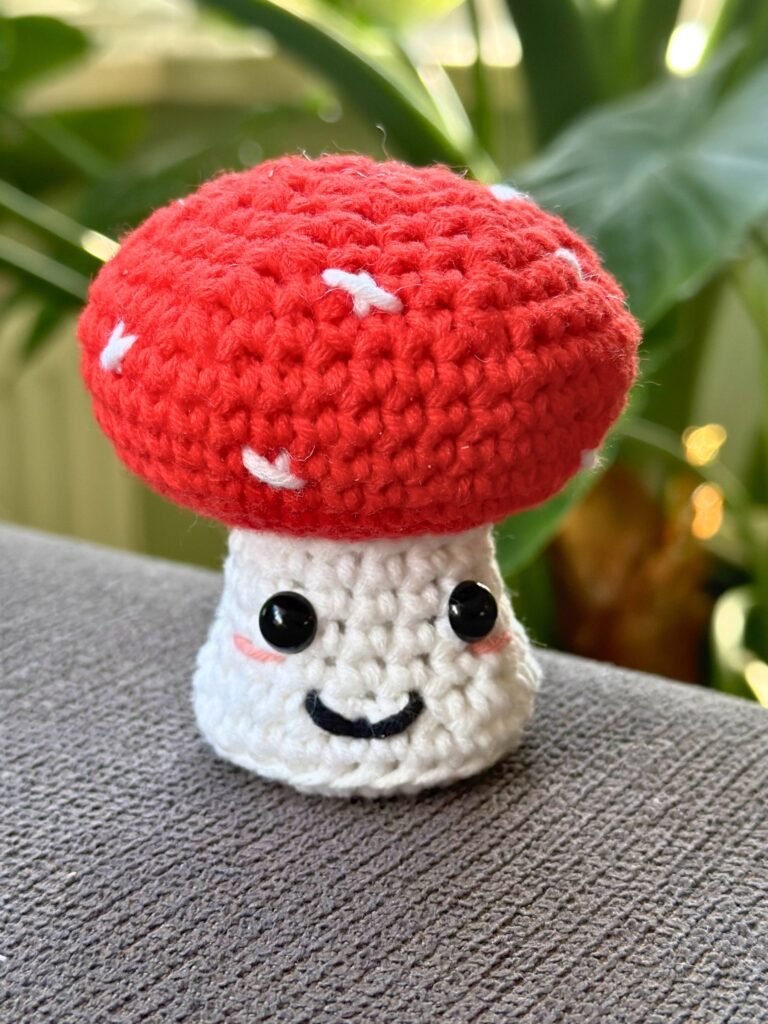
Is there anything more magical than a little forest mushroom popping up to say hello? 🍄✨
When I first started crocheting for my own peace of mind, I fell in love with amigurumi, but I’ll admit—I didn’t always love the sewing part! There’s nothing that breaks a “crafting flow” quite like having to stitch tiny limbs onto a tiny body.
That’s why I’m so excited to share this No-Sew Mushroom pattern with you today.
Designed to Stand Tall
I wanted this little friend to be more than just a toy. By using a “Back Loop Only” technique at the base, this mushroom has a perfectly flat bottom. It’s designed to sit securely on your desk, your bookshelf, or nestled in a potted plant without tipping over. It’s a tiny reminder of nature and peace that stays exactly where you put it.
Ready to grow your own little forest? Grab your yarn, and let’s get started!
Pattern Details:
- Difficulty: Beginner Friendly (No-Sew)
- Yarn: Worsted/Medium (4) weight yarn in Red and White
- Hook: 4.0mm (G) hook
- Extra Materials: 6mm Safety Eyes, Black yarn (for the smile), Pink yarn ( for the blush) Fiberfill stuffing.
Terminology (US):
- MR: Magic Ring
- SC: Single Crochet
- INC: Increase (2 SC in one stitch)
- DEC: Decrease
- BLO: Back Loop Only
- Sl St: Slip Stitch
Part 1: The Flat Base & Stem (Start with white yarn)
- Rnd 1: 6 SC in Magic Ring. (6)*
- Rnd 2: INC in each stitch around. (12)*
- Rnd 3: [SC, INC] x 6. (18)*
- Rnd 4: [2 SC, INC] x 6. (24)*
- Rnd 5 (BLO): SC in each stitch around. (24)*
- > This creates the “ledge” that lets your mushroom stand perfectly flat!
- Rnd 6: [2 SC, DEC] x 6. (18)*
- Rnd 7-8: SC in each stitch around. (18)**
- Rnd 9: [4 SC, DEC] x 3. (15)*x
- Rnd 10-11: SC in each stitch around. (15)**
- > Place safety eyes between Rnd 8 & 9 and 3 stitches in between. Sew the smile now while the piece is open!
- > Start stuffing the stem firmly.
Part 2: Transition to the Cap (Change to Red yarn)
- Rnd 12 (FLO): INC in each stitch around. (30)*
- > Working in the Front Loop Only here makes the cap “flare” out away from the stem.
- Rnd 13: [4 SC, INC] x 6. (36)*
- Rnd 14: SC in each stitch around. (36)*
- Rnd 15: [5 SC, INC] x 6. (42)*
- Rnd 16-18: SC in each stitch around (3 rounds). (42)***
Part 3: Closing the Top
- Rnd 19: [5 SC, DEC] x 6. (36)*
- Rnd 20: [4 SC, DEC] x 6. (30)*
- Rnd 21: [3 SC, DEC] x 6. (24)*
- Rnd 22: [2 SC, DEC] x 6. (18)*
- > Finish stuffing the cap firmly.
- Rnd 23: [SC, DEC] x 6. (12)
- Rnd 24: DEC x 6. (6)
- To finish: Cut yarn, weave through the last 6 loops, and pull tight.
Bringing Your Mushroom to Life: The Details
Now for the best part! Before you close up your mushroom (or once he’s finished), it’s time to give him some personality. You don’t need to be an embroidery expert—simple stitches look the most charming!
1. The Sweetest Smile
Using a single strand of black embroidery thread (or thin black yarn):
- Insert your needle from the back or bottom of the stem and bring it out centered between the eyes, one row below them.
- Create a small “V” or “U” shape by catching a stitch on the row below and anchoring it.
2. Little Pink Blushes
Using a small amount of soft pink yarn or embroidery thread:
- Stitch 2 or 3 small horizontal lines directly underneath (or slightly to the outside) of each eye.
- Alternative: Some makers love to use a little bit of real pink makeup blush and a Q-tip to gently “paint” the cheeks on!
3. The Magic Mushroom Spots
Using your white yarn and a yarn needle:
- Thread your needle and scatter “X” or “V” shaped stitches randomly across the red cap.
- Don’t worry about being perfectly symmetrical! In nature, every mushroom is unique. I like to do 3-5 larger spots on top and a few tiny ones near the edge of the cap.
- Knotting Tip: To keep your ends secure, tie the beginning and ending tails together inside the mushroom before you finish stuffing.
Congratulations!
You’ve officially finished your magical mushroom!
Show Off Your Work!
Crochet is a community, and I would love to see your finished Mushroom! Every time you share a photo, it helps other makers find my patterns. Instagram: Tag me @ydascrochetcorner
Yda’s Top Tips for Mushroom Success
1. How to get that perfectly flat bottom If your mushroom is still wobbling, check your BLO (Back Loop Only) round. Make sure your tension is nice and even during Rnd 5. If you find your base is “doming” (curving out), try using a slightly smaller hook just for the flat base. This keeps the stitches tight and the bottom flat as a pancake!
2. The “No-Gap” Color Change To get a clean line between the cream stem and the red cap, finish your last cream stitch by pulling the red yarn through the final two loops on your hook. This makes the transition invisible and professional.
3. Stuffing for Shape The secret to a mushroom that stands tall is in the stuffing. Stuff the stem very firmly, especially near the bottom base. For the cap, keep the stuffing a bit softer so it maintains that rounded, “squishy” look.
4. Making it “Child-Safe” If you are making this for a tiny human, remember to swap the plastic safety eyes for embroidered eyes using black yarn or thread. It’s just as cute and extra safe for little hands!
5. Those Famous White Spots Don’t worry about making the spots perfect! In nature, no two mushrooms are the same. I like to space mine out randomly—some high, some low—to give each little guy its own personality.
Copyright
This pattern is for personal use only. The design, photos, and written instructions are the intellectual property of YdasCrochetCorner. Sharing & Distribution: You may not copy, redistribute, or sell this pattern (or any part of it) in any form. Instead, feel free to share the link to my blog! You are welcome to sell physical items made from this pattern! If you sell them online, please provide a link to my shop or credit me as the designer (e.g., “Pattern by [YdasCrochetCorner]”).