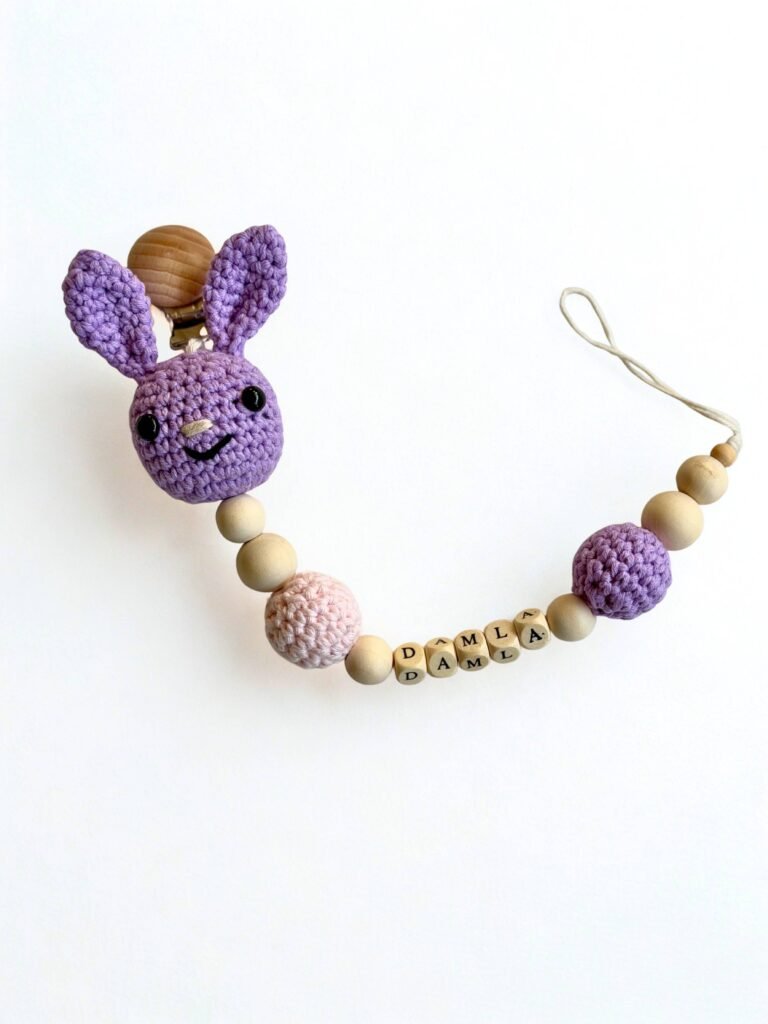
Following up on our super popular bunny rattle pattern, I couldn’t resist creating a matching project to go with it. Today, we are making a beautiful, personalized bunny pacifier clip. It uses the exact same sweet details as the rattle but on a smaller scale, and it features a mix of natural wooden beads and textured crochet beads.
If you’ve never assembled a pacifier clip before, don’t worry if it seems a bit like a puzzle at first. Threading everything securely is actually very straightforward once you know the right steps. This project makes the most wonderful, thoughtful newborn gift specially when you add wooden letter beads for a personalized touch.
So, pick up your lavender and pink scraps, grab your 3.5mm hook, and let’s get making!
Materials
- Wooden beads: A mix of sizes (e.g., 2x 25mm raw beads to cover, plus a selection of 20mm and 15mm accent beads)
- Wooden letter beads (optional, for personalizing)
- Pacifier clip (wooden clasp)
- Cord: Approx. 70–80 cm of strong, durable cord (satin nylon cord or strong cotton yarn)
- Crochet hook: 3.5 mm
- Yarn: Lavender and pink yarn suitable for a 3.5 mm hook, plus small amounts of beige (for the nose) and black (for the mouth)
- Safety eyes: 2 x 6 mm (or leftover black yarn to embroider)
- Fiberfill (polyester stuffing)
- Tapestry needle
Abbreviations
- MR: Magic ring
- CH: Chain stitch
- SL ST: Slip stitch
- SC: Single crochet
- INC: Increase (2 single crochet stitches in the same stitch)
- DEC: Decrease (invisible single crochet decrease joining 2 stitches together)
- STS: Stitches
- RND(s): Round(s)
- FO: Fasten off
Pattern Instructions
Head
Worked in continuous rounds. Stuff firmly as you go.
- RND 1: 6 SC into a MR {6}
- RND 2: INC in each ST around {12}
- RND 3: (SC in next ST, INC) x 6 {18}
- RND 4: (SC in next 2 STS, INC) x 6 {24}
- RND 5–9 (5 rounds): SC in each ST around {24}
Placing the Eyes: Attach the 6 mm safety eyes between RND 7 and 8, leaving about 7 stitches of space between them(count 5 holes).
- RND 10: (SC in next 2 STS, DEC) x 6 {18}
- RND 11: (SC in next ST, DEC) x 6 {12}
- RND 12: (DEC) x 6 {6}
SL ST to the next stitch. Fasten off, weave the tail through the front loops to close the hole, and hide the yarn tail inside the head.
Face Details: Using your tapestry needle, embroider a small horizontal nose with the beige yarn centered between the eyes. Use the black yarn to embroider a small, happy smile just below the nose.
Ears (Make 2)
Worked from the top of the ear downwards. Do not stuff.
- RND 1: 6 SC into a MR {6}
- RND 2: (SC in next ST, INC) x 3 {9}
- RND 3: SC in each ST around {9}
- RND 4: (SC in next 2 STS, INC) x 3 {12}
- RND 5: SC in each ST around {12}
- RND 6: (SC in next 2 STS, DEC) x 3 {9}
- RND 7–9 (3 rounds): SC in each ST around {9}
Fasten off, leaving a long tail for sewing. Fold the bottom opening of each ear flat in half, sew the edges together, and attach them securely to the top of the head.
Crochet Covered Beads (Make 2)
Make one in lavender and one in pink to cover a 25mm wooden bead.
- RND 1: 6 SC into a MR {6}
- RND 2: (SC, INC) x 6 {12}
- RND 3: (SC in next ST, INC, SC in next ST) x 6 {18}
- RND 4–5 (2 rounds): SC in each ST around {18}
- RND 6: (SC, DEC) x 6 {12}
Insert the Bead: Pull your starting yarn tail through the center hole of your wooden bead using your crochet hook. Push the wooden bead firmly inside the crochet shell.
- RND 7: DEC 5 times {7}
Fasten off, leaving a short tail. Thread the tail onto a tapestry needle and whip stitch through the front loops of the remaining stitches. Pull the yarn tight, making sure you leave a small opening clear that aligns with the bead’s central hole so your stringing cord can pass through later.
Assembly & Threading
Safety Note: For safety regulations regarding baby toys, the total length of a pacifier clip (excluding the metal metal/wooden clip itself) should not exceed 22 cm to prevent any choking or entanglement risks.
[Clip] === (Knot) === [Head] -> [Beads] -> [Letters] -> [Beads] === (Loop for Pacifier)
- Attach Cord to Clip: Fold your 80 cm cord exactly in half. Loop the folded center through the metal ring of your pacifier clip to create a secure lark’s head knot. Tie an extra tight double knot right against the clip metal for absolute security.
- Attach the Bunny Head: Thread both loose ends of the cord into a large tapestry needle. Push the needle straight up through the bottom center of the bunny head and out through the top center between the ears. Pull the cord tight so the head sits flush against the clip knot.
- Thread the Beads: Keep both strands of cord threaded through your needle. Now, string your beads in your preferred order. (For example: 15mm wooden bead, 20mm wooden bead, your pink crochet bead, a 15mm wooden bead, your wooden name letters, another 15mm wooden bead, your lavender crochet bead, and a final 20mm wooden bead).
- Create the End Loop: Once your beads are tightly pushed up against the bunny head and measure within the safe length limit, it’s time to secure the end. Tie a very tight, multiple-strength double knot directly against the final wooden bead.
- Form the Pacifier Loop: Leave a remaining loop of cord that is about 6 to 8 cm long (this loop is what loops through the pacifier handle). Bring the remaining loose ends back up and thread them backwards through the last two or three wooden beads. Tie another tight knot hidden between the beads, cut the excess cord, and carefully melt the ends with a lighter if using nylon cord to prevent fraying.
And you are completely finished! Now you have a gorgeous, matching set that is bound to turn heads at any baby shower. I absolutely love how the lavender and pink play off the natural wood grains, and the texture of those little crochet beads is amazing for sensory development.
If your threading felt a little tight or it took a couple of tries to get your bead sequencing exactly centered, don’t worry at all. Getting the tension right on assembly always takes a little patience, but the end result is so worth it.
If you make this clip especially with a personalized name please tag me or drop a comment below! I love seeing the name combinations you all come up with.
Until next time and happy crocheting!
Choosing the Best Yarn for Baby Projects
When you are making items that will inevitably end up in a baby’s mouth, yarn choice is everything. For this project, I highly recommend sticking with a 100% cotton yarn or a high-quality cotton-bamboo blend.
Here is why cotton is the gold standard for pacifier clips and baby toys:
- Washability: Cotton yarn is incredibly durable and can handle frequent hand-washing (or a gentle machine cycle in a mesh garment bag) without losing its shape or shedding fibers.
- Stitch Definition: It gives beautifully crisp stitch definition, which makes those little crochet beads pop with a lovely texture that babies love to explore with their fingers.
- Safety: Unlike acrylic or wool blends, pure cotton won’t “pill” or develop a fuzzy halo over time. This means there are no tiny loose fibers for a newborn to accidentally inhale or swallow.
If you are looking through your stash for substitutes, make sure to choose a sports-weight or DK-weight cotton that matches your 3.5mm hook tightly. We want our stitches on the bunny head and the bead covers to be quite firm, which prevents the polyester fiberfill from peeking through or escaping.
Essential Safety Guidelines for Pacifier Clips
Because we are creating something for a little one, safety needs to be our top priority during assembly. While making your bunny clip, please keep these crucial guidelines in mind:
1. Watch the Total Length
According to international safety standards for children’s items, the length of a pacifier clip should never exceed 22 cm (roughly 8.5 inches), measuring from the base of the wooden clip to the very end of the loop. Anything longer poses a serious strangulation or entanglement risk. If your name letters are quite long, you may need to drop a few of the round wooden accent beads to keep the finished chain within this safe limit.
2. Choose Safety Over Plastic Eyes
While 6mm plastic safety eyes look absolutely adorable on this bunny, they can still present a choking hazard if a toy is chewed on aggressively over many months. If you are gifting this to a newborn or a teething infant, I highly recommend skipping the plastic washers entirely and embroidering the eyes using a few simple French knots or small stitches with black cotton yarn. It looks just as sweet and gives you total peace of mind!
3. Knot Security and Inspection
When threading your cord, ensure every single knot is tied tightly and double-checked. If you are using a nylon satin cord (often called rat-tail cord), use a lighter to carefully melt the cut ends after tying your final hidden knots. This fuses the nylon together so it can never unravel. Always advise the parents to inspect the clip for any signs of wear, loose beads, or weakened thread before every single use.
Copyright
This pattern is for personal use only. The design, photos, and written instructions are the intellectual property of YdasCrochetCorner. Sharing & Distribution: You may not copy, redistribute, or sell this pattern (or any part of it) in any form. Instead, feel free to share the link to my blog! You are welcome to sell physical items made from this pattern! If you sell them online, please provide a link to my shop or credit me as the designer (e.g., “Pattern by [YdasCrochetCorner]”).