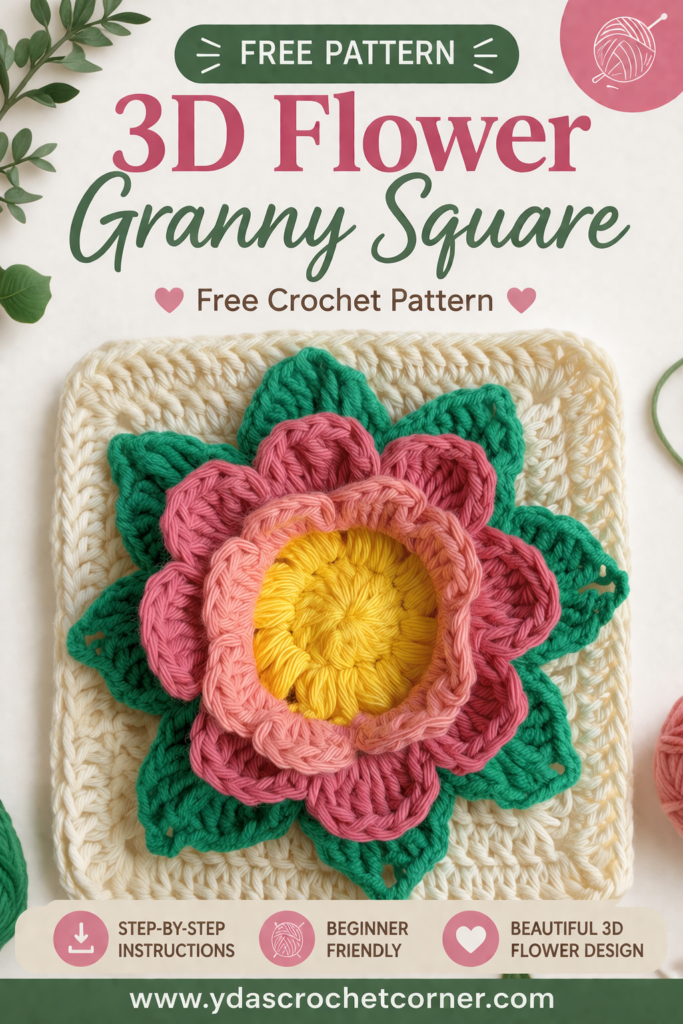
Learn how to crochet a 3D Flower Granny Square with this free beginner-friendly pattern. This design features a solid, no-gap border making it the perfect choice for crochet tote bags and sturdy blankets.
A Beginner-Friendly Pattern for Texture Lovers
There is something magical about a crochet project that literally pops off the page (or the blanket!). Most 3D floral squares can feel like a mountain of complex post stitches and confusing “wrong-side” rounds, but not this one.
I’ve designed this flower granny square to be beginner-friendly without losing any of that gorgeous dimension. By using simple stitches and a clever “behind-the-petal” anchoring technique, you’ll create a lush, layered flower that sits perfectly inside a sturdy granny frame.
Whether you’re making a garden-themed afghan, a textured tote bag, or a standout throw pillow, this square is about to become your new favorite “sit-and-stitch” project. Let’s grab a hook and get growing!
Materials You’ll Need
To get that vibrant pond-side look, I recommend using four different colors of yarn, but feel free to raid your scrap bin for a “wildflower” vibe!
- Yarn: Medium Weight (Size 4 / Worsted) Cotton or Acrylic.
- Color A: Yellow (Flower Center)
- Color B: Pink (Inner Petals)
- Color C: Darker Pink (Outer Petals)
- Color D: Off White (The Square Frame)
- Color E: Green (Leaves)
- Hook: 3.0mm Crochet Hook (or the size recommended on your yarn label).
- Notions: Yarn needle for weaving in those ends.
- Scissors.
- Stitch markers (optional, but helpful for marking the corners).
Abbreviations (US Terms)
- MR: Magic Ring
- ch: chain
- st(s): stitch(es)
- sl st: slip stitch
- sc: single crochet
- dc: double
- tr: treble crochet
Finishing Touches: The Secret to Perfect Squares
If your squares look a little “curly” or the 3D flower is pulling the corners in, don’t panic! This is completely normal for textured crochet. The secret to making them look store-bought is Blocking.
Why Block Your Squares?
Blocking trains the yarn to hold a specific shape. For this pattern, it ensures:
- Uniformity: Every square in your blanket will be the exact same size, making joining a breeze.
- Petal Definition: It helps the 3D petals “bloom” and stay open rather than curling inward.
- Straight Edges: It turns “wavy” sides into perfectly straight lines.
How to Block (The “Easy” Way)
- Pin it down: Lay your finished square on a foam blocking mat (or a thick, clean towel). Pin the four corners first, then pin along the edges to create a perfect square.
- The “Steam” Method (Best for Acrylic): Use a handheld steamer or the steam setting on your iron. Hold it 2-3 inches above the yarn. Never touch the iron to the yarn, or you might “kill” (melt) the fibers! Let the steam relax the stitches, then let it dry completely.
- The “Mist” Method (Best for Cotton): Lightly spray the square with a mist of water until it’s damp. Let it air-dry overnight.
Joining Your Squares
Once blocked, I recommend using the Invisible Mattress Stitch for a seamless look, or a Single Crochet Join on the right side if you want a braided, decorative ridge between your flowers.
Share Your Blooms!
I can’t wait to see your granny squares in the wild! If you make this square, tag me on [ydascrochetcorner] and use the hashtag #FlowerGranny.
Happy Hooking! 🧶✨
Special Stitches to Know
- Puff Stitch: [Yarn over, insert hook in stitch, pull up a loop] 3 times in same stitch (7 loops on hook). Yarn over, pull through all the loops. Chain 1 to close.
- Petal Loop: A chain-loop created behind or between stitches to give the petals a place to grow.
- Petal Shell: 7 Double Crochets worked into a single loop.
Phase 1: The Golden Center
Round 1 (Yellow): Make a magic ring. Chain 2 (does not count as a stitch). Work 16 Double Crochets into the ring. Slip stitch to the first DC to join. (16 sts)
Round 2 (Yellow): Chain 1. Work 1 Puff Stitch in every stitch around. Slip stitch to the top of the first puff to join. Fasten off. (16 Puffs)
Phase 2: The Blooming Petals
Round 3 (Bright Pink): Join yarn in any space between two puff stitches.
- Chain 3, skip one puff, sc into the next space. Repeat around. You should have 8 loops.
Round 4 (Bright Pink): Into each Ch-3 loop, work: [1 SC, 5 DC, 1 SC]. This creates your first 8 small petals. Fasten off.
Round 5 (Darker Pink): Join yarn with a slip stitch around any “post” (the vertical bar) from Round 4 (behind the petals)
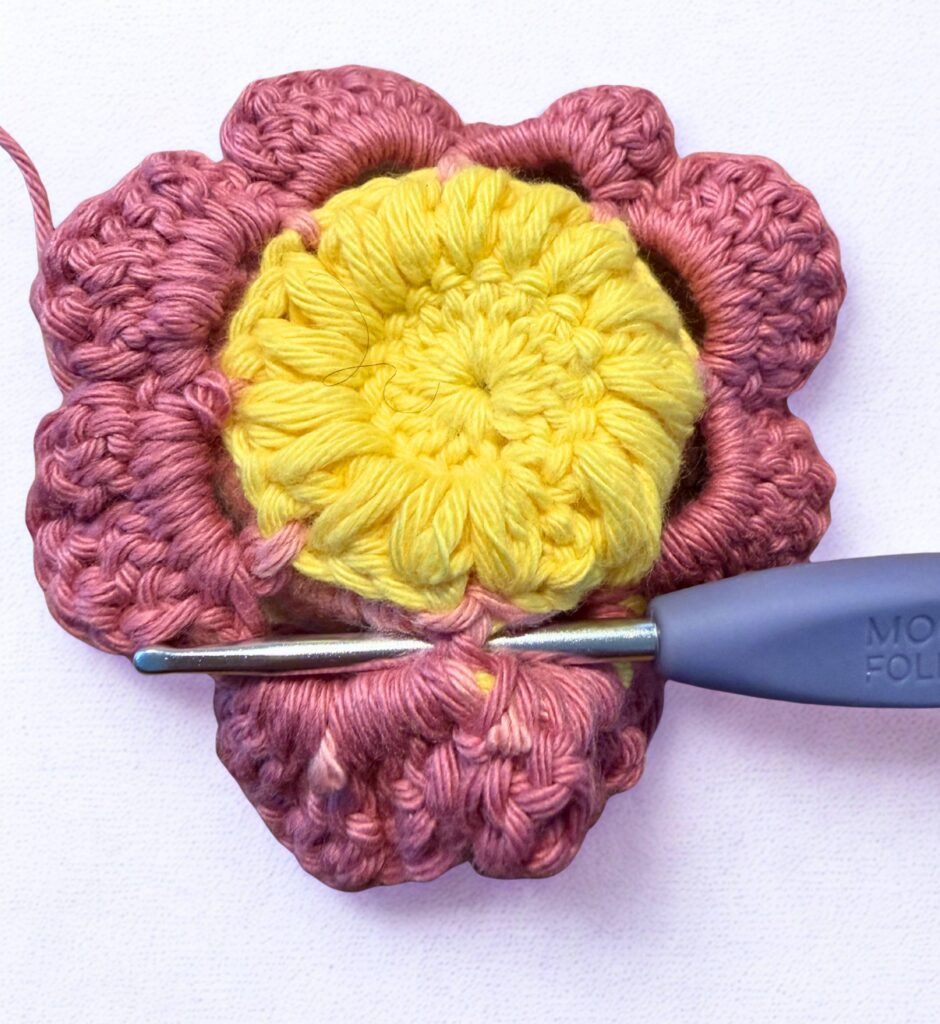
- Chain 5, sl st into the back of the next sc of round 4 . Repeat around and end with a sl st. (8 larger loops sitting behind the first layer).
skipped sc of round 2
Round 6 (Darker Pink): Into each Ch-5 loop, work: [1 sc, 7 TR, 1 sc ]. Fasten off.
Phase 3: Growing the Green Leaves
Step 1: The Anchor Loops
Round 7 (Green): Join your Green Yarn with a slip stitch around any “post” (the vertical bar) from Round 6 (behind the petals).
- Chain 8. Fold the next petal forward and slip stitch around the next back-post. * Repeat this all the way around until you have 8 large green loops hidden behind your flower.
- End with a slip stitch into the very first chain to join.
Step 2: Growing the Leaves
We will now work directly into those 8 loops to create the pointed water lily leaves. The Leaf Pattern: In the first Ch-8 loop, work:
[1 SC, 1 HDC, 3 DC, 3 TR, Chain 3, 3 TR, 3 DC, 1 HDC] * Repeat this sequence in each of the 8 loops. End with a sl st in the same ch space
You now have 8 green leaves!
Step 3: The Squaring Base (Gap-Free)
To get ready for the square frame, we need one more set of loops.
- Chain 5. * Push the leaf forward and work 1 sl st into the same back-post you used in the last step .
- Repeat this around until you have 8 loops of Chain-5.
- End with a sl st
- Fasten off and weave in your ends
Phase 4: The “Solid-Shell” Square Off
We will work into the 8 loops you created at the end of Phase 3. To keep it gap-free, we use Double Crochets to fill the space completely.
Round 8 (Green): Join yarn in any Ch-5 loop.
- Loop 1 (First Corner): Ch 3 (counts as DC), work [2 DC, Ch 2, 3 DC] all in this loop.
- Loop 2 (The Side): Work 6 DC in the next loop. (Filling it with 6 stitches ensures there are no holes!)
- Loop 3 (Second Corner): Work [3 DC, Ch 2, 3 DC] in the next loop.
- Loop 4 (The Side): Work 6 DC in the next loop.
- Repeat: Alternate [3 DC, Ch 2, 3 DC] in one loop and 6 DC in the next all the way around.
- Join: Sl st to the top of the starting Ch-3.
Repeat round 8 2x times
Phase 5: The “No-Gap” Border
Round 9 (Green or Bag Color):
- Ch 3 (counts as DC).
- DC in every stitch until you reach the corner space.
- In the Corner Space: Work [2 DC, Ch 1, 2 DC]. (Using only Ch-1 in the corner makes the hole much smaller!)
- DC in every stitch along the side.
- Repeat around and join with a slip stitch.
Round 10 (Optional Extra Strength): If you want the bag to be extra “bulletproof,” add a final round of Half Double Crochet (HDC) or Single Crochet (SC) in every stitch around, placing 3 stitches in each corner.
Copyright
This pattern is for personal use only. The design, photos, and written instructions are the intellectual property of YdasCrochetCorner. Sharing & Distribution: You may not copy, redistribute, or sell this pattern (or any part of it) in any form. Instead, feel free to share the link to my blog! You are welcome to sell physical items made from this pattern! If you sell them online, please provide a link to my shop or credit me as the designer (e.g., “Pattern by [YdasCrochetCorner]”).