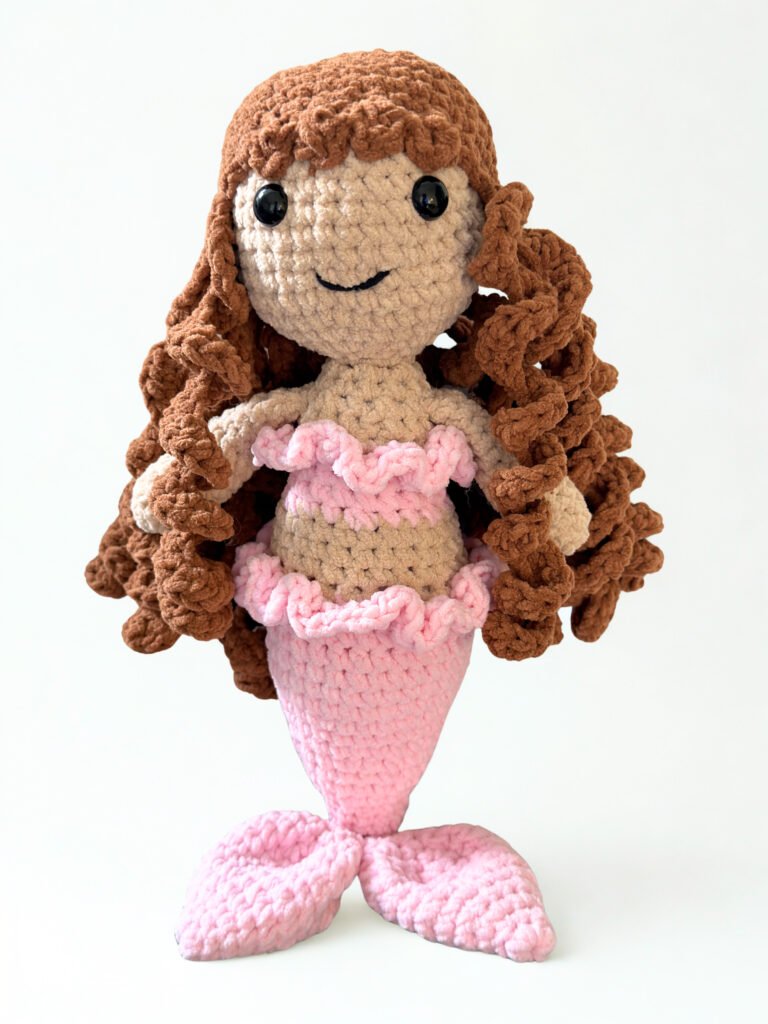
Looking for your next “big” project? Whether you’re prepping for a summer craft fair or making a gift for a little ocean-lover, this Chunky Crochet Mermaid is a total showstopper.
Measuring a generous 14.5 inches, she’s made with super-soft chenille yarn, making her incredibly huggable and surprisingly quick to work up. I’ve designed this pattern with a seamless transition from the shimmering tail to the ruffed top, and we’re topping her off with some bouncy, curly hair strands that are just so fun to bounce around!
Grab your 5mm hook and let’s dive into the waves.
Size: Approx. 37 cm / 14.5 inches Terminology: US Terms
Materials
- Hook: 5.0 mm
- Yarn: Chenille/Super Bulky (Weight 6)
- Brown (Hair): 50g
- Pink (Tail/Top): 40g
- Beige (Skin): 40g
- Eyes: 12mm Safety Eyes
- Stitch marker
- Tapestry needle
- Fiberfill stuffing
Abbreviations
- MR: Magic Ring
- ch: chain
- st(s): stitch(es)
- sl st: slip stitch
- sc: single crochet
- hdc: half double crochet
- dc: double crochet
- inc: increase (2 sc in one st)
- dec: decrease (sc 2 together)
- BLO: back loops only
- sk: skip
Pattern
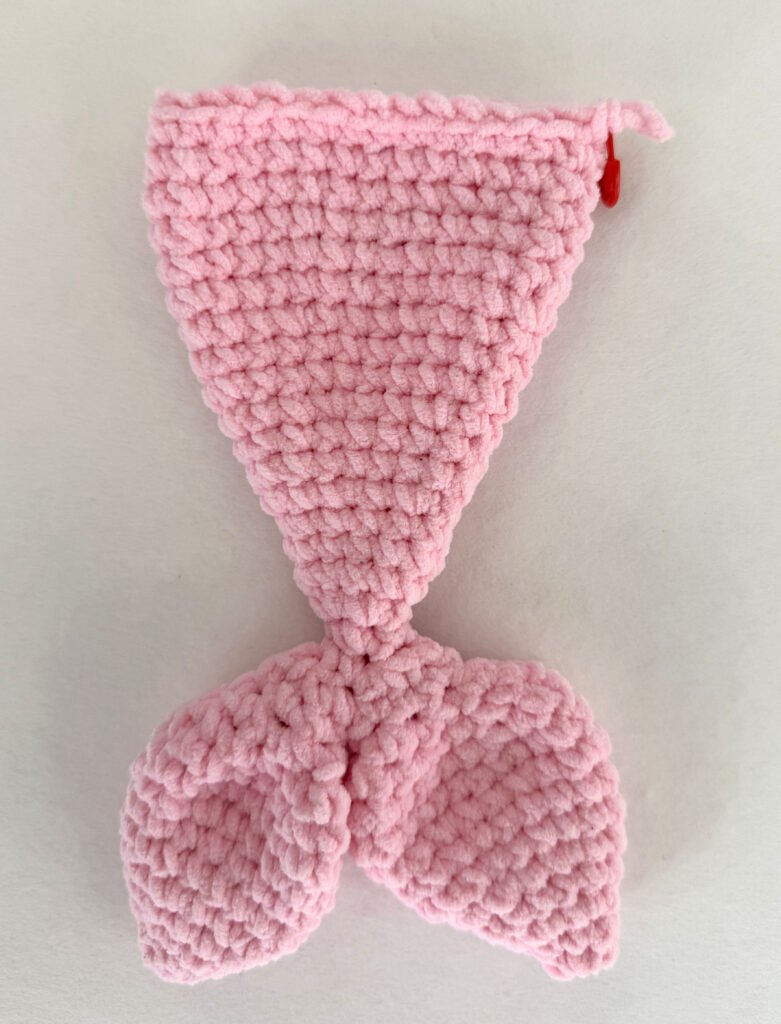
Tail & Body
Do not stuff.
Rnd 1: 6 sc in MR (6)
Rnd 2: Sc around (6)
Rnd 3: 6 inc (12)
Rnd 4: 12 sc (12)
Rnd 5: (1 sc, 1 inc) x6 (18)
Rnd 6–7: 18 sc (18) — 2 rounds
Rnd 8: (2 sc, 1 inc) x6 (24)
Rnd 9: 24 sc (24)
Rnd 10: (2 sc, 1 dec) x6 (18)
Rnd 11: (1 sc, 1 dec) x6 (12)
Rnd 12: 6 dec (6)
Fasten off Fin 1. Do not fasten off Fin 2
Rnd 13: Join fin 2 to 1 with a single crochet . Continue to single crochet all around the first fin and single crochet further around the second fin. Now you should have a total of 12 stitches.
Rnd 14: 6 dec (6)
Rnd 15–16: 6 sc (6) — 2 rounds
Rnd 17: 6 inc (12)
Rnd 18–19: 12 sc (12) — 2 rounds
Rnd 20: (1 sc, 1 inc) x6 (18)
Rnd 21–22: 18 sc (18) — 2 rounds
Rnd 23: (2 sc, 1 inc) x6 (24)
Rnd 24–25: 24 sc (24) — 2 rounds
Rnd 26: (3 sc, 1 inc) x6 (30)
Rnd 27–32: 30 sc (30) — 6 rounds
Change to Skin Color.
Rnd 33: In BLO: (3 sc, 1 dec) x6 (24)
Rnd 34–37: 24 sc (24) — 4 rounds
Change to Pink.
Rnd 38: (2 sc, 1 dec) x6 (18)
Stuff the tail and lower body firmly.
Rnd 39–41: 18 sc (18) — 3 rounds
Change to Skin Color.
Rnd 42: In BLO: 18 sc (18)
Rnd 43: 18 sc (18)
Rnd 44: (1 sc, 1 dec) x 6 (12)
Rnd 45: 12 sc (12)
Rnd 46: 6 dec (6)
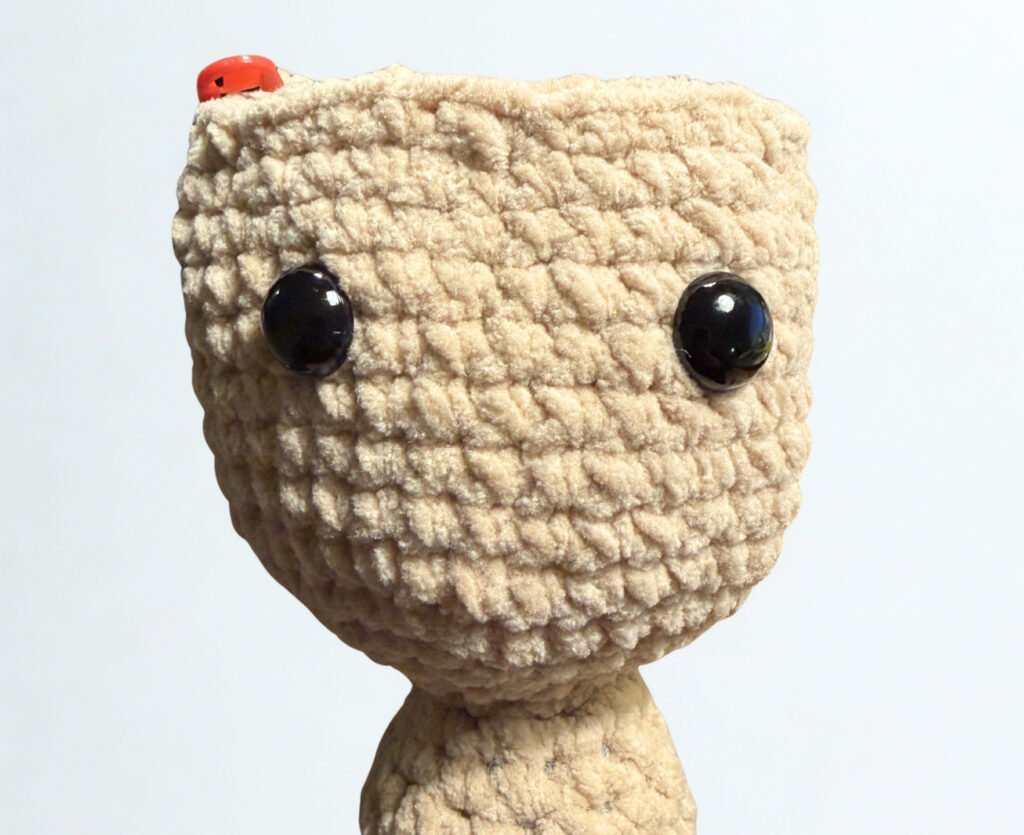
Stuff the torso firmly. Ensure the neck is stiff to support the head.Make sure the neck is stuffed much more firmly than the rest of the body. If it feels “squishy,” add more! It should feel solid to the touch.
Head
Rnd 47: 6 inc (12)
Rnd 48: (1 sc, 1 inc) x6 (18)
Rnd 49: (2 sc, 1 inc) x6 (24)
Rnd 50: (3 sc, 1 inc) x6 (30)
Rnd 51: (4 sc, 1 inc) x6 (36)
Rnd 52–59: 36 sc (36) — 8 rounds
Place safety eyes between Rnds 56 & 57, 7 sts apart.
Rnd 60: (4 sc, 1 dec) x6 (30)
Rnd 61: (3 sc, 1 dec) x6 (24)
Rnd 62: (2 sc, 1 dec) x6 (18)
Rnd 63: (1 sc, 1 dec) x6 (12)
Rnd 64: 6 dec (6)
Fasten off, weave tail through front loops of the last 6 sts, and pull tight.
Arms (Make 2)
Rnd 1: 6 sc in MR (6)
Rnd 2: (1 sc, 1 inc) x3 (9)
Rnd 3–12: 9 sc (9) — 10 rounds
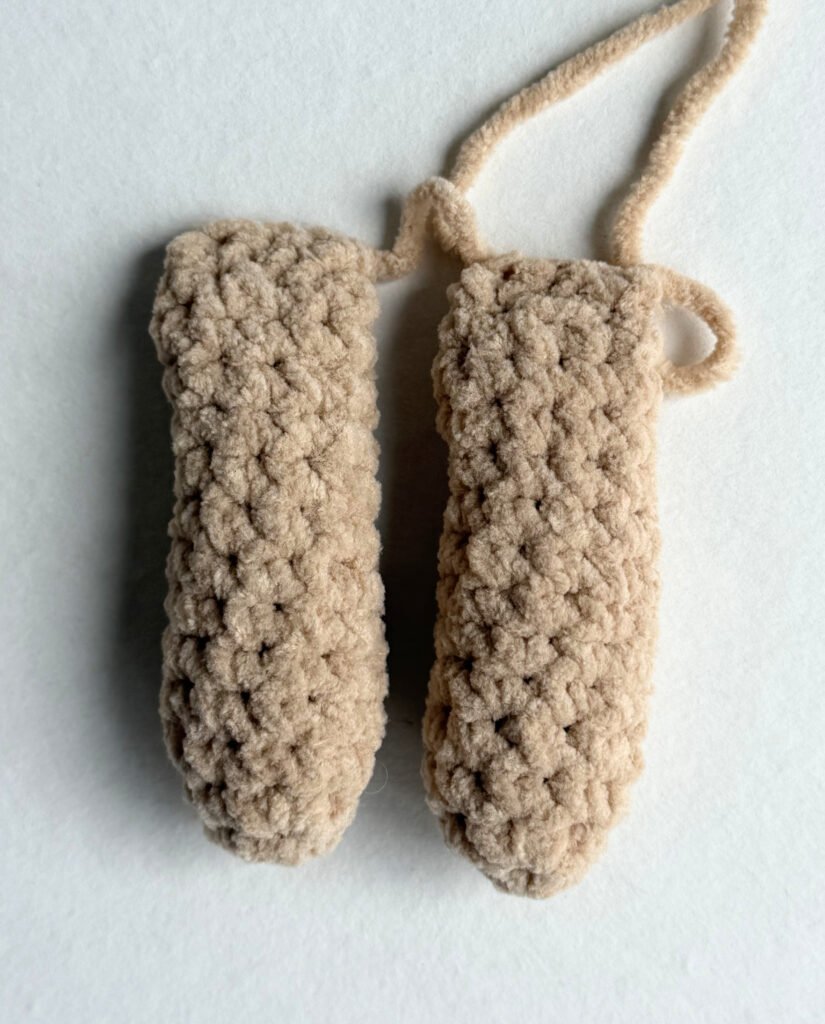
Lightly stuff the hand.
Fold flat and sc 3 across the top to close.
Sew to sides of body 2 rounds below the neck.
The Details
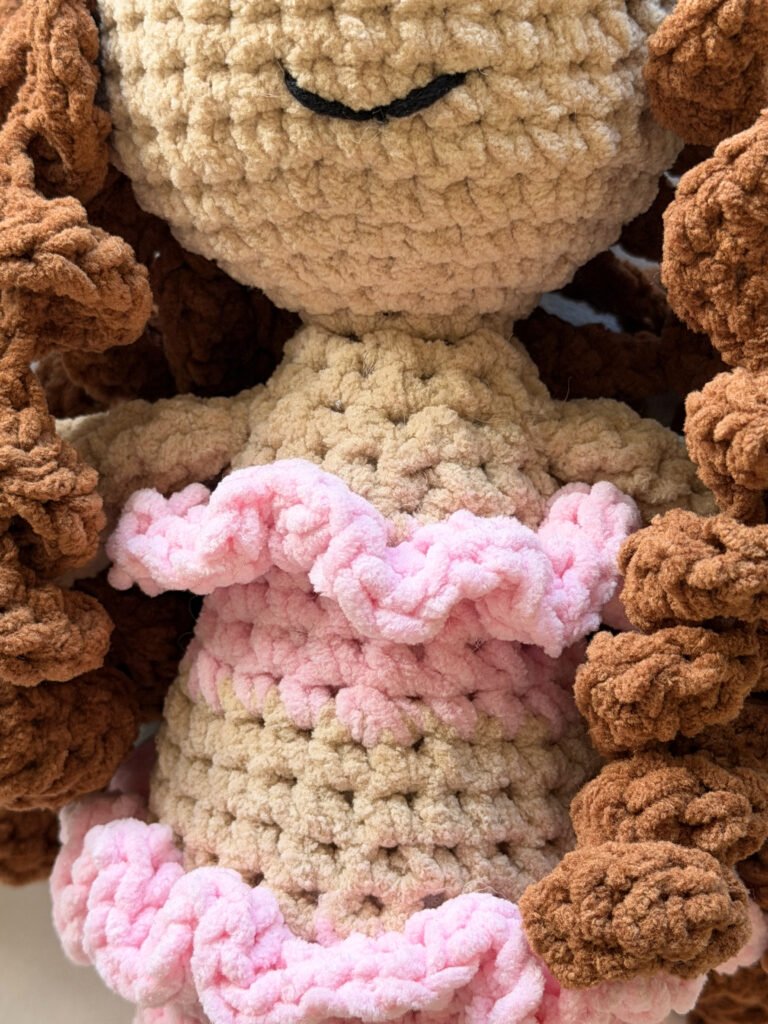
Lower Ruffle: Attach pink yarn to the front loops of Rnd 33. Ch 1, 3 hdc in each loop around. Sl st to join and fasten off. Weave in ends
Top Ruffle: Attach pink yarn to the front loops of Rnd 42. Ch 1, 3 hdc in each loop around. Sl st to join and fasten off. Weave in ends
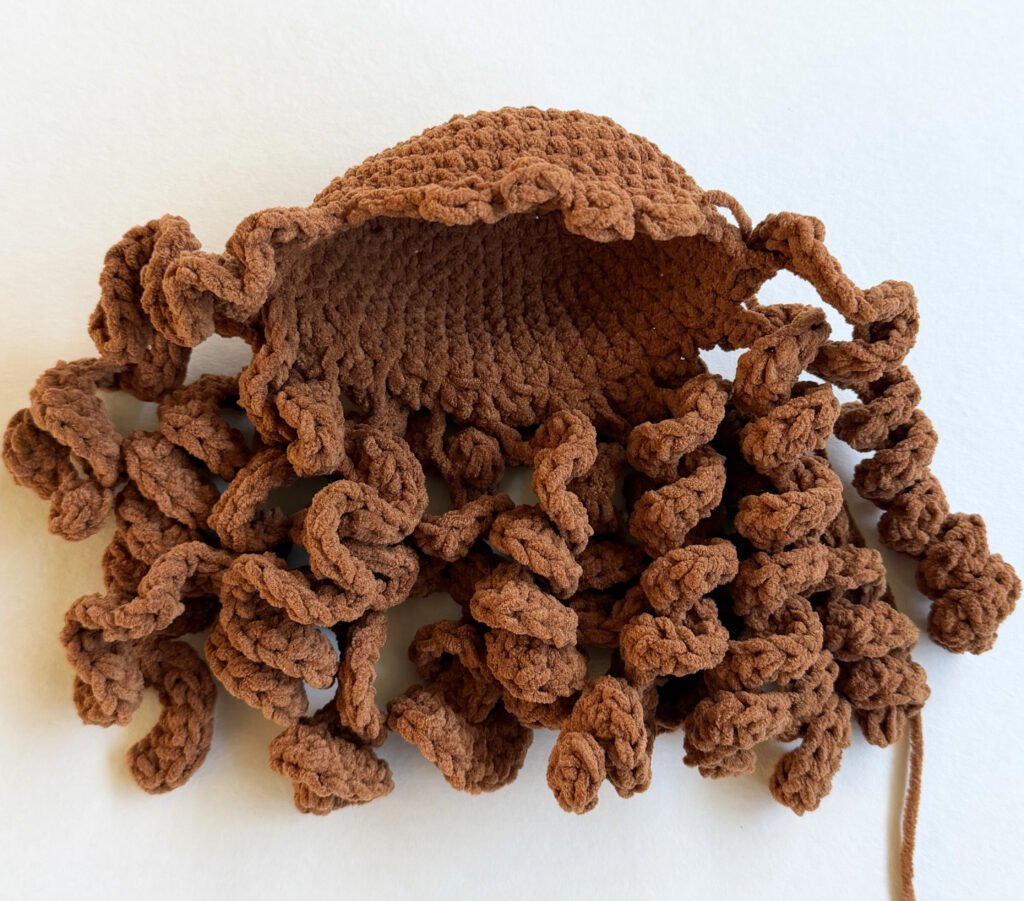
Hair Cap
Rnd 1: 6 sc in MR (6)
Rnd 2: 6 inc (12)
Rnd 3: (1 sc, 1 inc) x6 (18)
Rnd 4: (2 sc, 1 inc) x6 (24)
Rnd 5: (3 sc, 1 inc) x6 (30)
Rnd 6: (4 sc, 1 inc) x6 (36)
Rnd 7: (5 sc, 1 inc) x6 (42)
Rnd 8–12: 42 sc (42) — 5 rounds
Little “scalloped” bangs: (Sl st, ch 2, 2 dc in same stitch, skip 1 stitch, sl st in next) — repeat this 3 more times.
Fasten off and leave a long tail for sewing
Curly hair strands: Skip 3 stitches from the last “scalloped” bang. Attach yarn to hair cap and chain 35 st. Starting in the 2nd chain from the hook, crochet 2 hdc in each stitch till the base of the cap . Skip one stitch at the base and join with 1 sl st. (Repeat the curly hair sequence until you have 13 strands in total).
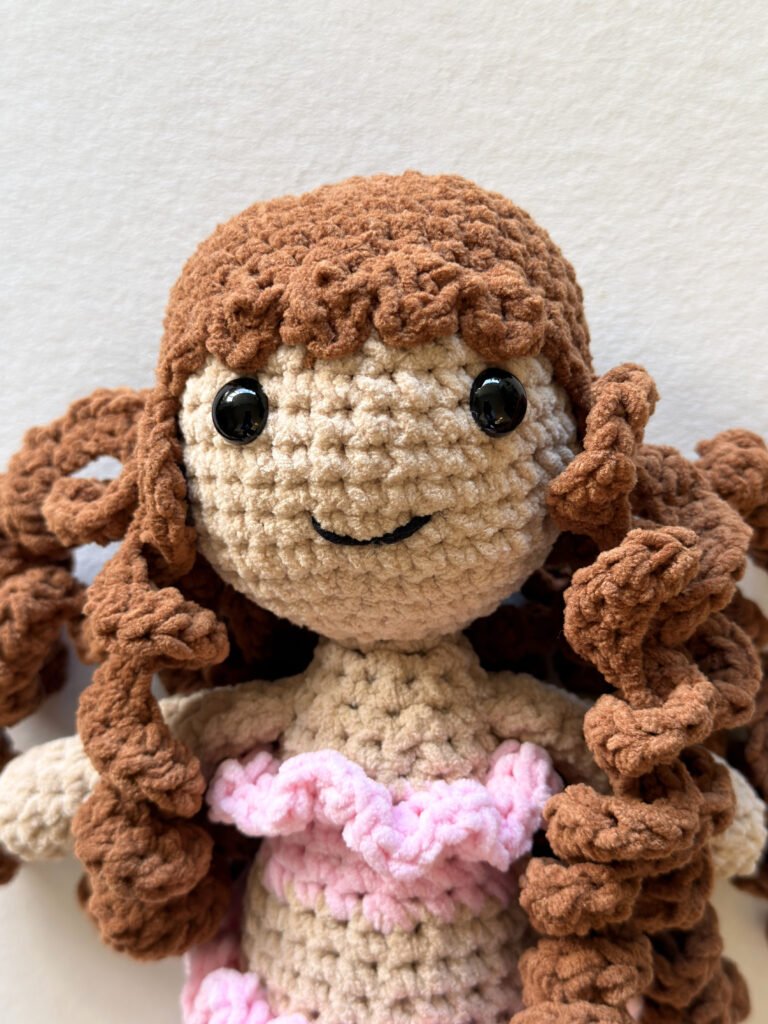
Pin the wig cap onto the head first to make sure the bangs are centered above the eyes. Use a whip stitch around the edge of the cap to sew it down.
Finish by embroidering a smile on the doll
Congratulations!
You’ve officially finished your magical Mermaid!
Show Off Your Work!
Crochet is a community, and I would love to see your finished Mermaid!
Every time you share a photo, it helps other makers find my patterns.
Instagram: Tag me @ydascrochetcorner
Top Tips for Working with Chenille Yarn
If this is your first time using chunky chenille yarn for amigurumi, here are a few “pro-secrets” to make your mermaid-making experience much smoother:
1. Use a Stitch Marker (Always!)
Chenille yarn is “fluffy,” which means stitch definition is almost non-existent. It is very easy to lose your place or skip a stitch because you can’t see the “V” on top. Mark the first stitch of every single round so you don’t end up with a lopsided tail!
2. The “Magic Ring” Alternative
Sometimes, pulling a Magic Ring closed with chenille yarn can cause the fibers to “shed” or snap the thread. If you find your yarn is getting stuck:
- The Alternative: Ch 2, then work all your Round 1 stitches into the second chain from the hook. It creates the same look with less friction!
3. Feel for the Holes
Since you can’t always see your stitches, try to feel them with your fingers. Insert your hook where you feel a gap in the fabric rather than trying to visually find the top of the stitch.
4. Secure Your Ends
Chenille yarn has a habit of “worming” (unraveling from the tail). When you fasten off, don’t just weave it in—knot it to a nearby stitch on the inside of the doll before hiding the tail. This ensures your mermaid doesn’t lose a limb during a snuggle session!
5. Don’t Over-Tighten
Because the yarn is bulky, if you crochet too tightly, the fabric will become stiff as a board. Aim for “firm but flexible” so she stays cuddly. If you see stuffing poking through, go down a hook size (e.g., to a 4.5mm).
Frequently Asked Questions (FAQ)
What is the best yarn for a crochet mermaid?
For a soft, “plushie” feel, Chenille or Velvet yarn (Weight 6/Super Bulky) is the best choice. It works up quickly and hides small stitching imperfections. If you prefer a smaller, more detailed doll, you can use 100% Cotton yarn with a 2.5mm hook.
How long does it take to crochet this mermaid?
Because this pattern uses bulky yarn and a 5mm hook, most intermediate crocheters can finish the mermaid in 4 to 6 hours. It’s a great weekend project!
How do I stop my amigurumi head from flopping?
The key to a sturdy crochet doll is the “Neck Bone” technique. By inserting a rolled piece of felt or a dense pillar of stuffing into the neck, you provide the structural support needed to hold up the head.
Can I use safety eyes for babies?
While 12mm safety eyes are standard for amigurumi, they can be a choking hazard for children under three. For babies, I recommend embroidering the eyes with black yarn or embroidery floss instead.
Is this pattern beginner-friendly?
Yes! This pattern uses basic stitches like single crochet, increases, and decreases. The most “advanced” part is the curly hair, but once you master the chain and half-double crochet, it’s very repetitive and easy to learn.
Copyright
This pattern is for personal use only. The design, photos, and written instructions are the intellectual property of YdasCrochetCorner. Sharing & Distribution: You may not copy, redistribute, or sell this pattern (or any part of it) in any form. Instead, feel free to share the link to my blog! You are welcome to sell physical items made from this pattern! If you sell them online, please provide a link to my shop or credit me as the designer (e.g., “Pattern by [YdasCrochetCorner]”).